Golden pruning tips for pistachio seedling
- Timing:
Late winter, before bud swell, on dry days. In cold regions, wait until the main frost risk has passed. Avoid heavy pruning in autumn.
- Ideal form: Open vase or modified leader with 4–5 strong primary scaffolds set at 50–70° angles and 15–25 cm of vertical spacing.
- Trunk height: About 100–120 cm for airflow and compatibility with mechanized harvest.
- Cut type: Prefer thinning cuts over heading cuts so light penetrates the canopy and fewer watersprouts are produced.
- Shoot selection: Remove upright shoots inside the canopy, crossing/rubbing limbs, and dead, diseased, or broken wood; keep outward, wide-angled branches.
- Managing alternate bearing: In on-years, prune a bit harder (to stimulate vegetative growth and moderate next year’s crop); in off-years, prune more lightly.
- Males vs. females: Prune male trees slightly harder with light heading to produce more one-year-old wood (spring pollen source); prune female trees more
gently to preserve fruiting wood.
- Cut hygiene: Prune only in dry weather; disinfect tools with 70% alcohol or sodium hypochlorite; remove and destroy diseased debris
(risk of Botryosphaeria/Cytospora canker).
- Sunscald protection: After opening the canopy and making large cuts, whitewash interior branches with diluted white latex paint (1:1 with water).
- After pruning: Dial back irrigation and nitrogen slightly to control watersprout growth; avoid leaving “stubs”—cut just outside the branch collar.
If you are interested, it is recommended that you read the following article / article title:
Types of fruit seedling and their characteristics
https://ekesht.com/en/blog/types-of-fruit-trees-and-their-characteristics
Training from sapling to bearing (first 3 years)
- Year 1:
- Head the sapling at 100–120 cm and tie it to a stake.
- Summer: keep 3–5 shoots with good angles and directions; pinch/remove the rest gently. Use spreaders/clips to widen branch angles if needed.
- Year 2 (winter):
- Finalize 4–5 primary scaffolds spaced around the trunk with adequate vertical spacing; remove the rest.
- Lightly head each scaffold (about 1/4–1/3) to an outward bud to promote good secondary branching; head stronger scaffolds less and weaker ones a bit more to
balance vigor.
- Year 3:
- On each scaffold, choose 2–3 secondary branches with proper spacing and direction; remove upright shoots inside the canopy and competing limbs.
- Keep the center open for light and air.
Maintenance pruning of bearing trees
- Remove about 10–15% of wood each year, smartly placed. Focus on thinning shaded and crossing branches rather than heavy heading.
- Pistachio bears on one-year-old wood; ensure ample light reaches this wood and avoid unnecessary heading that creates watersprouts.
- Summer green pruning: snap off basal suckers and vertical watersprouts while they’re soft to leave small wounds.
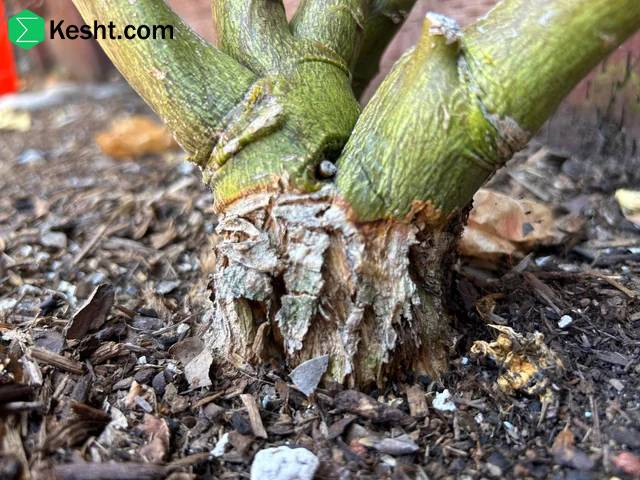
- Professional cuts: Don’t cut into the branch collar, and don’t leave stubs. Use the three-cut method on thick limbs to prevent bark tearing.
- Fruit sanitation: Remove mummified clusters and infected shoots to reduce disease inoculum.
Common mistakes (and quick fixes)
- Pruning too early in mid-winter cold → wait until major frost risk has passed.
- Heavy heading on mature trees → use thinning and targeted light management instead.
- Leaving tight angles in early years → use clips/spreaders to set wide angles.
- Skipping whitewash after opening the canopy → whitewash interior to prevent sunscald and canker.
- Not disinfecting tools in diseased orchards → disinfect between trees, especially in infected blocks.
Quick calendar
- Winter (main): Structural shaping/thinning on dry days, after frost risk and before bud swell.
- Spring: Review cuts, remove wind/frost damage; minimal pruning.
- Summer: Light green pruning (suckers and watersprouts), maintain internal light.
- Autumn: Postharvest sanitation only; avoid heavy pruning.
Best pruning window in dry vs. humid regions
- Dry (semi-arid to arid)
- Ideal: Late winter, after severe frost risk and before bud swell.
- Typical window (Northern Hemisphere/Iran): roughly Feb 4–Mar 15 (15 Bahman to 25 Esfand), ±10 days depending on year and cultivar.
- Key: If a cold snap returns, pause for a few days until it passes, then continue.
- Humid (frequent rain/fog)
- Ideal: Also late winter, but only during a 2–5 day dry spell; cuts should dry quickly to reduce canker/rot risks.
- Typical window: about Mar 1–15 (10–25 Esfand), contingent on a rain-free forecast. If rains persist and buds are near swelling, postpone heavy pruning and do
only minimal sanitation; plan light summer green pruning instead.
Why this window?
- In late dormancy, reserves are high and frost risk is lower; wounds callus faster and fewer watersprouts are induced. In humid climates, post-cut dryness is the
single most important factor to reduce disease.
Quick decision checklist
- Buds are still firm with scales closed (not swollen/green).
- Night minima above ~0 to −2°C for several consecutive days (major frost past).
- 48–72 hours forecast without rain/heavy fog; midday relative humidity lower.
- Tools disinfected; cuts made on dry days; whitewash interior branches exposed to sun.
Additional notes
- Male trees can be pruned slightly earlier and a bit harder than females, but the overall window is similar.
- Avoid heavy autumn pruning, and avoid late pruning after bud swell except to remove broken/diseased wood.
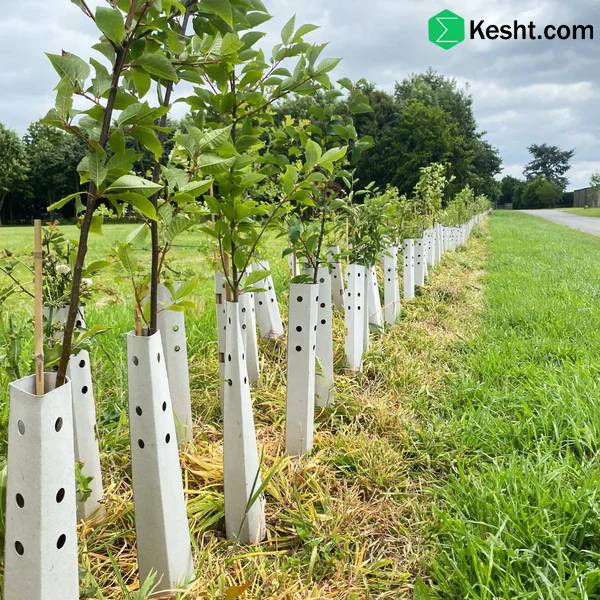
Open vase training steps for 1- to 5-year-old trees
Goals of the open vase
- Straight trunk to 100–120 cm (for ventilation and harvest).
- 4–5 strong primary scaffolds at 50–70°, evenly spaced around the trunk with 15–25 cm vertical separation.
- Keep the center open for light and air.
- Light, purposeful heading; favor thinning over heavy cuts.
- Timing: late winter (after frost, before bud swell) + light summer green pruning.
Year 1 (planting to year-end)
- Winter/at planting:
1) Head the tree at 100–120 cm and stake firmly.
2) Keep the trunk clean up to ~70–80 cm; you may leave a few small temporary leafy shoots to thicken the trunk (remove next winter).
- Summer:
1) Select 3–5 shoots with wide angles in different directions; remove competing soft shoots/buds.
2) Open angles to 50–70° with clips/spreaders.
3) Remove very upright interior shoots and crossing ones. Avoid heavy summer heading (promotes watersprouts).
Year 2
- Winter:
1) Finalize 4–5 scaffolds; remove central/competing leaders to keep the center open.
2) Lightly head each scaffold (about 20–30%) to an outward bud to build secondaries.
3) Balance vigor: on very strong scaffolds, use reduction/redirect cuts to a weaker lateral; on weak ones, very light heading or just thinning.
4) Remove inward, tight-angled, and rubbing branches. If the canopy opens, whitewash interior surfaces exposed to sun.
- Summer:
1) Break/remove soft watersprouts/upright shoots inside the canopy.
2) Maintain angles; tie or lightly weight if needed.
Year 3
- Winter:
1) On each scaffold, select 2–3 secondaries spaced 25–40 cm apart in different directions.
2) Lightly head secondaries (about 15–25%) to outward buds for balanced branching.
3) Keep the center open; thin inward/upright, crossing, and shading branches.
- Summer:
1) Light green pruning to remove watersprouts/suckers and preserve internal light.
2) Maintain angles and prevent overly upright secondaries.
Year 4
- Winter:
1) Structure is nearly complete; if needed, build 1–2 tertiaries per secondary in gaps only.
2) Control height and spread: use reduction cuts to outward laterals rather than blind heading to preserve open form and balanced height.
3) Thin shading and rubbing wood; keep the center open.
- Summer:
1) Minimal green pruning; remove watersprouts and maintain internal light.
Year 5
- Winter:
1) Enter maintenance phase: remove about 10–15% of wood annually (targeted thinning, not heavy heading).
2) Remove inward/crossing, dead or diseased wood; keep canopy open and balanced.
3) Males can be pruned a bit harder with light heading to increase one-year-old wood for pollen; females more gently to preserve fruiting wood.
- Summer:
1) Control upright watersprouts and basal suckers; keep the center open.
If you are interested, it is recommended that you read the following article / article title:
Key factors in pistachio seedling propagation (seed + grafting)
https://ekesht.com/en/blog/key-factors-in-pistachio-propagation-seed-grafting
Pro cutting technique
- Cut just outside the branch collar; don’t leave stubs.
- Use the three-cut method on thick limbs to prevent bark tearing.
- Disinfect tools between trees (and between cuts on infected trees) with 70% alcohol or 0.5–1% sodium hypochlorite.
- Prune in dry weather; in humid regions only in 2–5 day dry windows. After opening the canopy, whitewash interior branches exposed to sun.
Common errors (and fixes)
- Heavy heading in years 2–3 → use light heading plus reduction cuts; focus on thinning.
- Tight scaffold angles → set angles with clips/spreaders from year 1.
- Closing the center with upright shoots → remove competitors/uprights inside the canopy yearly.
- Heavy autumn pruning → do main work in late winter; autumn only for sanitation.
Practical guide to preventing post-pruning fungal infections (pistachio)
Golden rules
- Prune dry: only during 2–5 day rain-free, low-fog windows; keep cuts dry for the first 48–72 hours.
- Make proper cuts: thinning rather than heavy heading; cuts at the branch collar without stubs; three-cut method for big limbs.
- Tool hygiene: clean blades + frequent disinfection between trees (and between cuts on infected trees).
- Manage debris: remove infected wood from the orchard and destroy; don’t leave inoculum in place.
- Protect large wounds: on cuts >3–4 cm in high-risk orchards, use approved wound protectants/pastes.
- No overhead wetting: avoid any irrigation that wets foliage for 2–3 days after pruning.
- Monitor: inspect wounds 2–6 weeks later for canker symptoms.
Step-by-step checklist
1) Timing and work order
- Choose late winter, after frost and before bud swell, on sunny/dry days.
- Humid climates: work midday (lower humidity) and only in dry windows; stop if rain returns.
- Sequence: healthy blocks → suspect → infected. Disinfect tools/gloves when entering each block.
2) Cut technique and risk reduction
- Cut at the branch collar without stubs; don’t strip bark (use the three-cut method on heavy limbs).
- Keep cut diameters as small as possible; minimize cuts >3–4 cm.
- Prefer thinning (removing the whole offending branch) over heading (shortening), which creates many wounds and watersprouts.
- On dead/diseased wood, cut 20–30 cm below discolored tissue.
3) Tool disinfection
- Physical cleaning first: remove sap/soil with a brush/cloth; disinfectants don’t work on dirty blades.
- Reliable options and contact time:
- 70% alcohol (ethanol/isopropyl): spray/dip to wet thoroughly; ≥30 seconds.
- 0.5–1% sodium hypochlorite: make 10–20% solution of 5% household bleach; 1-minute contact. (Corrosive to metal—rinse and oil blades at day’s end.)
- Quaternary ammonium compounds (QACs): per label (typically 0.1–0.3%) and contact time.
- Frequency: between trees; on infected trees, between cuts.
- Solution management: replace every 1–2 hours or when cloudy. Alcohol is flammable—keep away from ignition.
4) Debris management
- Remove cankered/infected wood from the orchard and burn, or compost hot (≥55–60°C for several consecutive days).
- Chipping and leaving in place is for healthy wood only and mainly in dry climates; in humid areas it can become inoculum.
- Collect and remove last year’s mummies and dried fruiting twigs.
5) Wound protection and aftercare
- Small cuts: typically don’t need sealants; keeping them dry is best.
- Large cuts (>3–4 cm) or orchards with heavy Botryosphaeria/Cytospora history:
- Paint wound edges with diluted white latex (1:1 with water) to reduce sunscald/cracking; not a fungicide, but reduces stress and secondary cracking.
- Where permitted and disease pressure is high, use approved pastes/paints containing copper or labeled fungicides (e.g., thiophanate-methyl) on large cuts
, strictly per label. Avoid non-breathable tars/adhesives that trap moisture.
- Protective spray: in high-risk, humid orchards, a copper spray (e.g., copper oxychloride/hydroxide) within 24 hours after pruning, applied in dry weather,
can lower surface infection risk. Always follow product labels and local regulations.
6) Moisture and water stress management
- For 48–72 hours, avoid irrigation that wets the canopy (overhead/micro-sprays that reach foliage).
- Keep the canopy open and ventilated so cuts dry quickly.
- After heavy pruning, temporarily reduce nitrogen so you don’t stimulate lush, tender watersprouts.
7) Post-pruning monitoring
- Recheck large wounds 2–6 weeks later: blackening margins, gumming, radial cracks, or dieback are red flags.
- If seen, recut 20–30 cm below infected tissue; disinfect tools between cuts; remove the wood from the orchard promptly.
If you are interested, it is recommended that you read the following article / article title:
Selecting the right seedling according to different regions and climates of Iran
Climate notes
- Humid regions: higher sensitivity; more frequent disinfection, shorter dry windows, wound protection on large cuts, complete removal of infected debris.
- Dry regions: lower disease risk but higher sunscald risk after opening the canopy; interior whitewashing is very important.
Guide to choosing pruning tools and blades for pistachio
- For live wood: bypass hand pruners + tri-edge hand saw; SK5 carbon steel blades with anti-stick coating.
- For dead/thick wood: long-handled bypass lopper (to 35–45 mm); above that, a 27–33 cm pruning saw or a pole saw.
- Large orchards: battery-electric or pneumatic pruners greatly boost productivity (with training and proper safety).
- Humid climates: prioritize PTFE or hard-chrome coatings + frequent disinfection; ventilated sheaths and dry storage.
Tool categories and suggested specs
| Tool | Primary use | Recommended capacity | Key features |
| Bypass hand pruners | Live wood, small branches | Up to 20–25 mm | Curved bypass blade, forged SK5 steel, sap groove, PTFE/chrome coating, ergonomic
handles (sized), adjustable center bolt, shock absorber |
| Anvil hand pruners | Dead wood | Up to 20–25 mm | For dead wood only; crushes live tissue |
| Bypass lopper (long-handled) | Medium branches | Up to 35–45 mm | Bypass head, 45–75 cm handles (preferably telescopic), geared/compound leverage, replaceable blade, strong bumper |
| Hand pruning saw | Branches >30–40 mm | 27–33 cm blade | Tri-edge teeth, pull-cut action, curved blade for overhead, induction-hardened teeth, hook tip for control, belt sheath |
| Pole saw/pruner | Out-of-reach branches | Up to 6–8 cm | 3–4 m fiberglass pole, secure joints, 33–37 cm curved blade; small rope-head pruner only for twigs |
| Battery-electric pruners | Speed in large blocks | 25–45 mm (model-dependent) | 14–36 V batteries, bypass blade, safety lock, cut-resistant gloves; training required |
| Pneumatic pruners | Professional crews | 25–35 mm | Light and fast; needs PTO compressor/hoses; hose management in-row |
| Light chainsaw (pro) | Very thick/dead limbs | >10 cm | Top-handle 12–14 in bar, semi-chisel low-kickback chain; trained operator only |
Blades: types and geometry
- Bypass for live wood: clean cuts with minimal crushing of phloem/cambium—default choice for pistachio.
- Anvil for dead wood: suitable for dead material; crushes live wood and slows healing.
- Steel and heat treatment:
- Forged SK5 or Cr-V carbon steel: holds an edge and can be field-sharpened.
- PTFE/hard chrome coatings: reduce friction and sap sticking (very useful in humid climates).
- Edge angle: 20–25° for durability on pistachio’s relatively hard wood; a 2–3° micro-bevel increases longevity.
- Saw blades:
- Tri-edge teeth, pull-stroke cutting, 3–4 mm tooth pitch (~7–8 TPI) for live wood; slightly coarser pitch for very dry wood.
- Curved blades improve overhead control; straight blades cut more precisely near collars at low height.
- Induction-hardened teeth are typically non-sharpenable; replace the blade when dull.
If you are interested, it is recommended that you read the following article / article title:
Pistachio seedling spraying time
https://ekesht.com/en/blog/pistachio-tree-spraying-time
Suggested kits by task
- Training (years 1–3, open vase)
- Bypass hand pruners sized to hand (20–25 mm capacity, rotating handle if heavy use).
- Light 60–70 cm bypass lopper for 25–40 mm competitors.
- 27 cm curved hand saw with belt sheath.
- Annual maintenance of bearing trees
- Bypass hand pruners + telescopic bypass lopper.
- 30–33 cm hand saw (spare blade).
- 3–4 m pole saw for interior overhead branches (reduces ladder use).
- Professional/large orchards
- 1–2 battery-electric pruners with two spare batteries and field charger.
- Modular fiberglass pole saw + hand saw with spare blade.
- Disinfection kit (70% alcohol or 0.5–1% hypochlorite), tool belt, quality sheaths.
Care, sharpening, and calibration
- Cleaning: after each shift, remove resin/dust with warm water and mild detergent or a light solvent; dry and lightly oil pivots and blades.
- Disinfection during work: between trees (and between cuts on diseased trees) with 70% alcohol or 0.5–1% hypochlorite; contact time 30–60 seconds.
- Sharpening: daily or whenever cuts crush/tear.
- Pruners/loppers: 300–600 grit diamond file/stone; work only the outer bevel at 20–25°; deburr with 2–3 light passes on the flat back.
- Saws with hardened teeth: replace blade; non-hardened can be filed (specialist job) with a triangular file.
- Adjustments: tighten the center bolt to remove play while keeping smooth motion; replace worn bumpers and springs.
Safety and ergonomics
- Cut-resistant gloves and safety glasses; high-ankle footwear. For overhead work, a light helmet helps.
- Use an aluminum tripod orchard ladder on firm ground; never work on soft mud or steep slopes.
- Choose handle size to fit your hand (right-/left-handed models exist). Rotating handles reduce tendon strain.
- Always sheath saws and pruners to prevent cuts and keep blades dry.
If you are interested, it is recommended that you read the following article / article title:
The impact of fertilization on pistachio seedling growth and health
https://ekesht.com/en/blog/the-impact-of-fertilization-on-pistachio-growth-and-health
Climate tips
- Humid: anti-stick coatings, ventilated sheaths, frequent disinfection, don’t store tools wet in sheaths.
- Dry/dusty: frequent dusting and light oiling of pivots; harder steels (SK5) keep an edge longer.
Mechanized pruning equipment for pistachio + indicative throughput, savings, and labor needs
Levels of automation (from assist tools to heavy mechanization)
- L1 – Powered assists: battery-electric pruners, pneumatic pruners (PTO compressor), battery-powered pole saws.
- L2 – Platforms and logistics: self-propelled or tractor-towed orchard platforms for multi-person ladder-free work; mechanized residue collection and
in-row chipping/shredding (PTO).
- L3 – Row mechanical cutting: tractor-mounted hedgers/toppers (circular saw blades or bar saws) to reshape the canopy, followed by selective touch-up pruning.
- L4 – Emerging/exploratory: selective pruning robots with machine vision (not yet widely commercial in pistachio).
Summary of performance and savings (indicative; varies with age, intensity, spacing)
| Equipment category | Application | Typical field capacity | Manual labor savings | Uptime | Notes |
| Battery-electric pruners | Selective pruning of live wood up to 25–45 mm | 1.5–2.0× manual speed | 25–40% fewer person-hours | 85–95% (with 2 batteries/shift) | Less fatigue; training and safety essential |
| Pneumatic pruners + PTO compressor | Similar to above; larger crews | Near electric | 20–35% | 65–85% (hose management downtime) | Best for long rows or semi-fixed stations |
| Battery/petrol pole saws | Removing overhead limbs 60–120 mm | +0.2–0.4 ha/person/shift | 10–20% (with powered pruners) | 80–90% | Reduces ladder moves |
| Self-propelled/towed platforms | Safe, fast multi-person access | 0.3–0.6 ha/shift/team | 15–30% on overhead work | 70–85% | Eliminates ladder time; more uniform quality |
| Tractor hedger/topper (disk/bar saw) | Row-side and top trimming | 0.8–1.6 ha/machine-hour | 30–60% (with touch-up) | 60–75% | For row orchards with uniform canopies; be cautious with classic open-vase pistachio |
| PTO in-row chipper/shredder | In-place residue shredding | 1.0–2.5 ha/machine-hour | 50–80% on collection/hauling | 70–90% | Reduces passes and traffic; produces mulch |
| Windrower/rake for residues | Gathering prunings mid-row | 0.8–1.5 ha/hour | 30–50% cleanup savings | 70–85% | Often precedes in-row chipping |
| Mobile PTO compressor | Powers 3–6 pneumatic pruners | — | — | 85–95% | Cost-effective for large crews |
Person-hour model (illustrative)
- Baseline assumption: medium pruning intensity; manual pruning ≈ 100 person-hours/ha; cleanup/collection ≈ 30 person-hours/ha; total = 130 person-hours/ha.
- Scenario A (battery pruners): pruning −30% → 70 + cleanup 30 = 100 person-hours/ha (≈23% total savings).
- Scenario B (battery pruners + platform): pruning −50% → 50 + cleanup 30 = 80 person-hours/ha (≈38% savings).
- Scenario C (battery pruners + in-row chipper): pruning −30% → 70 + cleanup 10 = 80 person-hours/ha (≈38% savings).
- Scenario D (hedger + touch-up + chipper): touch-up 30–50 person-hours/ha + chipper 10 + hedger 1–2 machine-hours/ha → equivalent 40–60 person-hours/ha
If you are interested, it is recommended that you read the following article / article title:
Best times of year to fertilize pistachio seedling
https://ekesht.com/en/blog/best-times-of-year-to-fertilize-pistachio-trees
+ 1–2 machine-hours/ha (≈54–69% manual labor savings vs. baseline).
Field notes for pistachio
- Mechanical hedging: in pistachio with irregular open-vase forms, indiscriminate hedging can cause watersprouts and short-term yield dips. If used, limit it to
“keeping canopy volume and machine clearance,” and follow with selective touch-up pruning.
- Best ROI often comes from combining battery pruners + in-row chipper plus a shared platform for the crew. In orchards >20–30 ha, payback of 1–3 seasons is
common (depends on local labor costs).
- Real uptime depends on row logistics, crew training, daily maintenance (sharpening/oiling/battery swaps), and dry weather windows.
Suggested implementation roadmap
1) Quick, low-cost: battery pruners for all cutters + disinfection kit + battery pole saw for overhead cuts.
2) Cut cleanup costs: in-row chipper/shredder + windrower/rake (when volume is high).
3) Crew productivity: one self-propelled or towed platform for ladder-free multi-person work.
4) Large, uniform blocks: tractor hedger/topper with a plan for targeted touch-up pruning.
Post-pruning strengthening tips to boost pistachio yield
Objectives after pruning
- Speed wound healing, control watersprouts, maintain internal light.
- Balanced nutrition for budbreak, bloom, and nut set.
- Moisture and hygiene management to prevent disease.
If you are interested, it is recommended that you read the following article / article title:
which nutrients are essential for pistachio seedling?
https://ekesht.com/en/blog/which-nutrients-are-essential-for-pistachio
Timed checklist (0 to 60 days after pruning)
- Days 0–3
- Work only in dry weather; in orchards with canker/rot history, apply a protective copper spray per label.
- Whitewash interior, newly exposed wood with diluted white latex (1:1 with water).
- Avoid any irrigation that wets foliage.
- Weeks 1–2
- Keep irrigation “light and even”; avoid drought shocks and also heavy sets that trigger lush watersprouts.
- If pruning was “heavy,” reduce nitrogen 15–25% for 2–3 weeks to temper vegetative surge.
- Pre-bloom foliar spray (if needed): target micronutrients on unfolding leaves (details below).
- Weeks 3–6
- As nut set begins, introduce potassium through fertigation; small, steady doses beat heavy slugs.
- Light green pruning: remove upright watersprouts and basal suckers so resources go to nuts.
- Sanitation touch-ups: remove any newly dried or suspect twigs.
If you are interested, it is recommended that you read the following article / article title:
How to test soil before fertilizing
https://ekesht.com/en/blog/how-to-test-soil-before-fertilizing
Nutrition and foliar spray guide (adjust to soil/leaf analysis)
- Nitrogen (N)
- After light/medium pruning: follow the usual plan in split applications from spring flush to mid-summer.
- After heavy pruning: reduce 15–25% for the first 2–3 weeks; then return gradually to normal. Too much N now = many tender watersprouts → shade and
reduced fruiting.
- Potassium (K)
- Key for nut size and fill. From early nut set to mid-summer, apply K (e.g., potassium nitrate/sulfate/thiosulfate) in small, continuous fertigation doses.
- Calcium and magnesium
- Adequate levels strengthen tissues and stress tolerance. In soft water, periodic calcium nitrate helps.
- Micronutrients (high-impact post-pruning)
- Zinc (Zn): common deficiency in pistachio; a pre-bloom Zn spray with a small amount of low-biuret urea supports new leaves and buds.
- Boron (B): aids buds and pollination pre-bloom; excess can be toxic—respect recommended rates.
- Iron/manganese: in calcareous soils, if chlorosis appears, use chelates suited to soil pH.
- Sample pre-bloom foliar mixes
- ZnSO4 0.5–1% + low-biuret urea 0.5–1% + boric acid 0.1–0.2% (apply before full bloom, in cool, calm weather)
- Notes: tank pH 5.5–6.5; avoid mixing with copper/phosphites in the same pass; always spot-test on a few trees first.
Irrigation after pruning
- Core principle: keep soil consistently moist without saturation; large moisture swings cause flower/fruit drop.
- Pruning intensity and first 2–3 weeks irrigation:
- Light (<10% wood removed): normal schedule.
- Medium (10–20%): ~10–15% less than usual, then ramp back.
- Heavy (>20–25%): ~15–25% less than usual; monitor growth; resume normal as leaf growth stabilizes.
- Avoid overhead/misting that wets foliage for 3–4 days.
Managing growth and light
- Keep the interior bright; remove any upright watersprout casting shade during green pruning.
- Preserve outward, wide-angled secondaries to carry next year’s one-year-old fruiting wood.
- Whitewash interior surfaces exposed to sun (after opening the canopy) to prevent sunscald and canker.
Hygiene and protection
- Disinfect tools during maintenance/green pruning (70% alcohol or 0.5–1% hypochlorite).
- Remove diseased debris from the orchard; chip and spread only healthy wood (critical in humid climates).
Common mistakes that reduce yield
- Rushing heavy nitrogen immediately after pruning → excessive watersprouts, shade, and reduced flowering.
- Water shocks (drought/saturation) during bloom and nut set → flower/fruit drop.
- Foliar sprays without spot-testing and pH control → leaf/flower burn.
- Leaving large cuts unprotected from sun after opening the canopy → sunscald and disease.
If you are interested, it is recommended that you read the following article / article title:
Organic vs. mineral fertilizers for pistachio seedling and their benefits
https://ekesht.com/en/blog/organic-vs-mineral-fertilizers-for-pistachio-and-their-benefits
We are the “ekesht” platform — a subsidiary of Samin Atlas Iranians and the only official exporter of BlueLabel seedlings in Iran
Why Blue Label?
Because the world only trusts these seedlings!
Ordinary seedlings (without labels or other labels), even if one of them is infected, can destroy your entire garden — without you realizing it!
But the advantage of Blue Label seedlings:
✅Each of them has a global barcode
✅Tested in advanced laboratories
✅Free from any viruses and microbes
✅The only seedlings that are allowed to be legally exported!
This is important for you if:
- You want to build a garden that is productive and hassle-free
- You are looking for a long-term investment in gardening
- You want to start without stress, without losses, without surprises!
Blue Label seedlings = peace of mind
Because when the seedlings are healthy, the garden stays healthy — and real profits come!
Contact us now — before a random seedling destroys your garden!
Healthy Seedlings = Fruitful Garden = Smart Investment
And that’s exactly what we do at ekesht.
ekesht platform (with fifteen years of practical and successful trade experience with Russia, Kazakhstan, Iraq, China, Turkmenistan, Turkey, etc.) is ready to cooperate with people active in the field of agriculture.
For more information and additional information, please contact us via social media, phone call or email
Phone number:
Email:
Social media address: